Showing posts with label Tim Holtz Distress Inks. Show all posts

Tuesday, September 1, 2020

Autumn Is Calling Gecko Galz Sept 2020

 Welcome Back Friends,

Robin here with Gecko Galz Blog sharing a couple of fun projects centered around Autumn. Autumn is my favorite time of year! I love the cooler days, the colors that autumn bring, the crunch of the leaves beneath my feet, the smell of cinnamon, and the fact that my favorite holiday is in there too! 

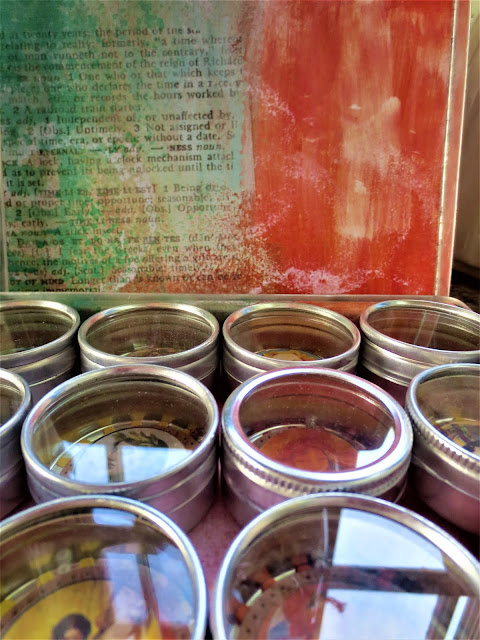
My first share involves upcycling a bead tin into a one of kind piece! 


For this project I used the Artist Circles Jewel It Collection and various size circles, cogs and gears. A mix if different small beads, and the containers that came with the box. I love how it all came together!


My next project I want to share is so my style!!   I love little books and little books with ink edges make my heart sing! I used the Autumn Splendor Collage Set and the page 3 from the Autumn Calling Paper Pack. 


Thank You for visiting and as always I appreciate your kind comments.

Until Next Time....

Robin 

Sunday, May 10, 2020

Spring Daffodils Coffee Beans May 2020


Welcome Back Friends,

Where is Spring? April 1 is the day I turn off the heat, not this year. I live in Northeast Ohio, it snowed on May 9. Needless to say my daffodils are frozen.  Thanks to the The Coffee Bean Stamping Machine, I brightened up my craft room while working with their digi daffodils.


Here's what I did
I covered a MDF tag with white card stock. Using Distress Oxide, Fossilized Amber I stenciled the left side of tag. I colored the daffodils with same ink, using a small oval make up brush. I added color to leaves using the same brush and technique. Fussy cut the image out, adhere to the tag. Add a black bow, add black flat back pearls.

Be sure to visit the Coffee Beans blog to see what my talented team mates have created.

Thanks for visiting and as always I appreciate your kind comments

Until Next Time.....

Robin


Wednesday, April 22, 2020

Fly Free Altered Mix Media Paintbrush. GG April 2020


Welcome Back Friends,

 Robin here sharing a project for Gecko Galz Blog,  Spring has sprung! I love hearing the birds early spring after a long quiet winter. I am a early riser and out the door most days early morning, it warms my heart to hear their beautiful song.


I feel in love with the Collage Sheet Fly Free, and was excited to work with such beautiful images!

Here is what you need:
Paintbrush
Paint
Sponge Brush
Lace
Small roses
Flat back pearls
Walnut Ink Stain
Leaf Die Cut
Berry Die Cut
Heat Tool
Hot Glue Gun
Fly Free Collage Sheet

Here is what I did"

I painted the paint brush here and and the bristles top and bottom. I carefully fried it with my heat tool. I hit the bottom of the bristles to not only dry, nut to give it a used look, as the bristles will melt and shrink a bit. I scratched paint off here and there to lend to the used loo.

I die cut leaves, berry twigs and fussy cut the images out I chose to use.

I rounded the corners and distressed the edges on the images.\

Assembly came next using a hot glue gun, add the lace, the die cut leaves and berry twigs, roses and flat back pearls. Viola! Done

Thank You for visiting and as always I appreciate your kind comments.

Until Next Time,

Robin


Wednesday, July 10, 2019

Creating With Infinity Engraving Open Door July 8 2019


July 8 2019

Welcome Back Friends,

Doors, such a fascinating subject! Well, at least where I hail from! Cuyahoga Falls, Ohio a suburb of Akron Ohio. Our area is richly steeped in American Indian history and also the rubber industry since its birth!. We have calendars, books, prints, published with beautiful Akron doors! Most of the doors featured are of those that have founded and fueled our area.  I had a chance to create my own door with the release of Creating with Infinity Engravings chip board  door collection! Infinity Engraving Etsy Store can be found here: Creating With Infinity Design

Use coupon code: 4Freedom for 10 % of any product released in July!


I used Tim Holtz Distress Ink - Peeled Paint and a eye shadow applicator to color the door frame , I used patterned paper for the wall inside the door. The sentiments, and wreath were stamped out.

Thank You for visiting and I appreciate your kind comments.

Until Next Time...........

Robin

Tuesday, July 9, 2019

Addicted To Stamps and More # 349 CAS July 10 2019


July 10 2019

Welcome Back Friends,

It is with pleasure that I announce that I made the design team for Addicted To Stamps and More Challenge Blog!!  which can be found here: Blog

I am not much of a gardener per say, however, my hubby loves yard work and gardening, flowers and eating gardening too! I have many beautiful shrubs, blubs, and the like, that return year after year and put on a beautiful show! Some of my very favorite flowers belong to the daisy family with Blanket Flower and Shasta Daisy's being my very favorite! I created a my Clean and Simple card based off of my favorites and supplies I had on hand.

Here is my supply list:

White card and envelope
Adhesive
Corner rounder- EK Success Scalloped Corner Rounder
White Embossing Powder
Versamark Ink
Sponge blender pad for inks
Eye shadow applicator for petal blending
Ink Pads- Tim Holtz Distress Ink in colors: Broken China, Blended Sage, Mustard Sees, and Fossilized Amber
Stamp and dies cut set: Stampendous- Build a bouquet set


Here is what I did: I rounded top and bottom right hand corners of my card, set a side.
I stamped and heat embossed the bouquet pieces I chose to use, I then added color to the pieces using the inks listed above. I die cut them out, using their coordinating dies and then set aside.
I added a very faint Broken China blue, spot, blending it well,  at the bottom of card, so my jar looked grounded
I then built my bouquet, adhering pieces as I went.
That's it!

I hope I have inspired you to create today!

As always I appreciate your visit and kind comments.

Until next time......
Robin


Conjure of Dreams Santa on Vacation!

 Merry Christmas, and Yule Blessings, Have you ever wondered were Santa would vacation? I have! Here is where I think Santa and the Mrs. wou...